A simple pattern which can be a very good practice for an amigurumi beginner.
Materials and Tools needed:
- Acrylic yarn Lane Cervinia in YELLOW and BROWN colours
- In addition small amount of BLACK YARN
- Hook size 2.5mm
- Polyfill
- Stitch marker indicating the end of each row
- Tapestry needle
- Scissors
- Finished Size: Approximately 10cm (4in) high. If you are using different yarn brand or type, use a hook size at least 0.5mm less than suggested on the yarn label (applicable only for acrylic yarn) to create tight stitches.
- All the instructions and abbreviations are given in American (US) terms
- Work in continuous rounds without turning unless otherwise specified in the pattern
- For instructions marked with * check the Amigurumi adjustable ring, Fasten off when working in continuous rounds and French knot posts.
BODY
Row 1: Using YELLOW YARN stitch 6 sc into an adjustable ring*. Total 6sts
Row 2: (2sc in each st) times 6. Total 12sts
Row 3: (2sc in next st, 1sc in the next st) times 6. Total 18sts. Tighten and secure the adjustable ring.
Row 4: (1sc in the next two sts, 2sc in next st) times 6. Total 24sts
Row 5: (2sc in next st, 1sc in the next three sts) times 6. Total 30sts
Row 6-11: 1sc in each st around. Total 30sts in each row
Row 12: (sc2tog, 1sc in the next three sts) times 6. Total 24sts
Row 13-19: 1sc in each st around. Total 24sts in each row
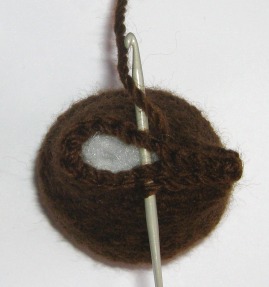
Stuff the body with polyfill and using slst connecting the front with the back as indicated in the photos below. Fasten off*, secure and hide the tail.
WINGS, make two
Row 1: Using BROWN YARN stitch 6 sc into an adjustable ring*. Total 6sts
Row 2: (2sc in each st) times 6. Total 12sts
Row 3: (3sc in next st, 1sc in the next three sts) times 3. Total 18sts
Row 4: 1sc in the next st, (3sc in the st, 1sc in next five sts) times 2, 3sc in the st, 1sc in next four sts. Total 24sts
Row 5: 2sc into next st, 1sc in next three sts, 2sc in next st, 1sc in next five sts, 1hdc-dc-1hd into next st, 1sc in next five sts, 2sc in next st, 1sc in next three sts, 2sc in next st, 1sc in next two sts, slst into next st. Total 30sts
Fasten off* leaving 25cm (10in) tail.
EYES, make two:
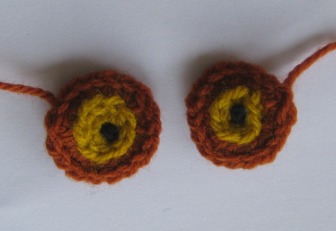
Row 1: With YELLOW YARN stitch 9sc into an adjustable ring. Total 9sts
Row 2: slst in each st around. Total 9slsts
Fasten off and secure the tail. Also tighten and secure the adjustable ring.
Row 3: Introduce BROWN YARN into the 1st ROW and stitch 2sc in each st of 1st row. Total 18sts
Fasten off leaving 25cm (10in) tail.
Finishing and Decoration
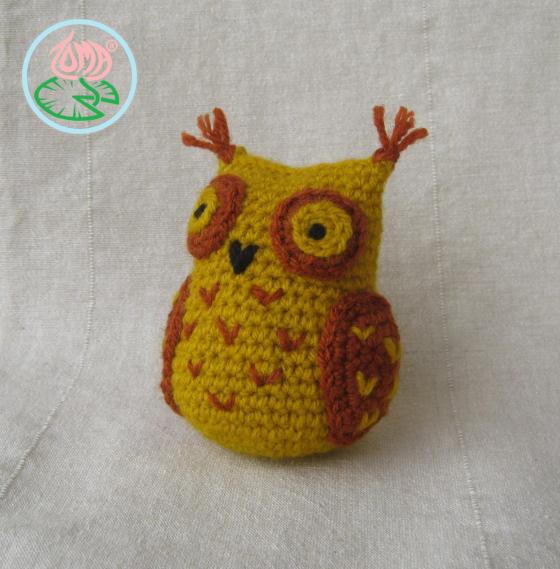
Decorate the wings by using single strand of YELLOW YARN, stitch straight stitches forming V shapes [photo below]. Then sew the wings to the sides using the 25cm (10cm) tail.
Using BLACK YARN stich French knots in the middle of the eyes [photo below]. Sew the eyes to the face using the 25cm (10in) tail.
Stitch the beak, bird’s nose, by using double strand of BLACK YARN , stitch a V shape between the eyes
Decorate the belly by using single strand of BROWN YARN, make V shapes by stitching straight stitch
Ears: insert the hook at the top side of the head, yarn over two stands of BROWN YARN, and pull the loop through [photo below]. Yarn over the tails and pull them through the loop just made. Trim the tails
And voila you have a sophisticated owl
Enjoy 🙂
PLEASE NOTE:
You may not copy, resell, translate, post on the internet or redistribute (fully or partially) this pattern.
If you would like to sell finished items made with this pattern please contact me in advance and mention that the item is ‘based on the pattern designed by Toma Creations’
Mass production and Internet sales of the finished item based on the pattern are not allowed.


so cute – I’m going to give it a try
LikeLike
let me know how it goes 🙂
LikeLike
I hope you can help as I’ve made 3 wings with your instructions and I’m stuck on this row:
Row 4: 1sc in the next st, (3sc in the st, 1sc in next five sts) times 2, 3sc in the st, 1sc in next four sts. Total 30sts
I can only get 24 stitches. It makes the wing comes out lop-sided.
I want to make this work with the wings since I’ve already got the body completed, stuffed and slip stitched close.
Thanks in advance for your help!!
Dottie Kile
LikeLike
Hi Dottie, thank you for trying my pattern and also noticing the mistake , i will adjust it! round 4 is actually 24sts: sc ,( 3sc inc, sc × 5) × 2, 3sc inc, sc × 4
LikeLike
Finished the owl and it’s so cute! Thanks for sharing the pattern!
LikeLike
Great 😀 thank you again for noticing the mistake & im glad you’ve fished it !!! happy crocheting
LikeLike
I love your owls, I’d like to make a few for a local church Christmas Fair, would that be possible.
LikeLike
Hi Mary, thank you for your kind words, definitely you can, as many as you like; happy crochet 🙂
LikeLike
Hello!
Would it be alright if I made a few of these to sell at my Band Fundraiser? I absolutely adore this pattern!
LikeLike
Thank you Hannah 🙂 definitely you can make as many as you like. Happy crochet
LikeLike
Love this pattern, made the owl while in England, my sister liked it so much I had to leave it with her!
LikeLike
thank you for your lovely comment 🙂
LikeLike
Pingback: Amigurumi Sophisticated Owl Free Crochet Pattern ⋆ Crochet Kingdom
I’m just getting back into crocheting and would like to make some quick projects for our church’s annual craft fair. I was asked to find patterns for small animal toys and your little owl is perfect! May I use your pattern to make some for the sale? Thank you for the work you’ve put into sharing your creativity!
LikeLike
Hi Patty, sure you can, all the best
LikeLike
Pingback: Crochet Owl Patterns - Cute And Cool Crochet Owl Patterns• DIY & Crafts
Pingback: 26 interesujących wzorów na sowę – na szydełko – Blogg
Pingback: Amigurumi häkeln - 225 kostenlose Amigurumi-Häkelanleitungen - Pin Media
Pingback: 35 Free Crochet Owl Patterns - Crochet Amigurumi - Amigurumi
Pingback: 20 Amigurumi Crochet Owl Free Patterns For 2020
Pingback: Crochet Animals for Animal Lovers | Just Crafting Around
Pingback: Crochet Amigurumi - 225 Free Crochet Amigurumi Patterns ⋆ DIY Crafts